My Grandfather on my father's side, served in the United States Army and served at the Upper Heyford Airbase in England during 1954. The airbase is situated 5 miles (8km) Northwest of Biscester in Oxfordshire and has been abandoned since 15th December 1993.
On our trip to England we managed to get a tour of the base and learn some of its history.
History of the Base:
Upper Heyford Airbase opened in 1916 and was used by the UK Royal Flying Corps (1916-1918) and the Royal Air Force (1918 - 1950). The Royal Air Force used the base mostly for training, however it housed RAF Bomber Command Number 18 of Number 57 Bomber Squadron of the 70th Bomber Wing of the Number 2 Bomber Group.
 |
| RAF Upper Heyford Airbase |
In 1950 the Americans wanted airbases in Europe to combat the rising cold war tensions and acquired four bases in Oxfordshire - Upper Heyford, Brize Norton, Fairford and Greenham Common.
On the 26th of June 1950 the 801st Engineering Aviation Battalion extended the existing runway from 6,000ft to 8,300ft and built hardstands for the heavier B-36 and B-50 bombers.
The first United States Air Force (USAF) personnel arrived on the 7th of July 1950 and consisted of one officer and 26 airmen of the 7509th Air Base Squadron.
The base was officially handed over to the USAF on the 15th of May 1951.
The base hosted Temporary Duty Assignments (TDY) for several groups including:
- 93rd Bomber Wing,
- 97th Air Refuelling Squadron,
- 509th Air Refuelling Squadron,
- 301st Bomber Wing,
- 8th Air Sea Rescue Squadron,
- 2nd Bomb Wing,
- 5th Bomb Wing Detachment and
- 22nd Bomb Wing.
The base was redesignated on the 25th of May 1951 to the 7509th Air Base Group and on the 10th of January 1952 it became the 3918th Air Base Group. The 3rd Air Force handed control over to Strategic Air Command.
 |
| 3918th Strategic Wing |
By December 1951 the base housed 15 B-50D Boeing Superfortress Bombers of the 328th Bombardment Squad
 |
| B-50D Boeing Superfortress Bomber |
In 1952 the 2nd Bombardment Wing (3 Squadrons) arrived and Upper Heyford was capable of housing 45 aircraft.
In 1954, when my Grandfather served, the Convair RB-36 Peacemaker aircraft of the 5th Strategic Wing arrived. These were strategic bombers that were capable of delivering conventional or nuclear payloads. It was the primary nuclear delivery vehicle of Strategic Air Command. The official line was that Upper Heyford never housed nuclear weapons, but more on that later.
 |
| Convair B-36 Peacemaker |
During the 1954 period when my Grandfather served, Upper Heyford was used to monitor the Soviets and to prepare for quick response if an attack was detected. My Grandfather served in the 98th Chemical Company, who were responsible for deploying smoke screens if an incoming attack was detected. This would prevent the enemy from making visual contact with the base and hopefully prevent a successful attack.
In 1958 the airbase was renamed the 3918th Combat Support Group and by the end of the 1950s Boeing B-52 Stratofortress bombers had arrived on the base.
 |
| B-52 Stratofortress Bomber |
In 1962 the reconnaissance side of the base was enhanced with the arrival of the U-2 top secret strategic reconnaissance aircraft. These aircraft were used to conduct high altitude air sampling and analysis during Soviet nuclear testing to determine the composition and yield of soviet weapons.
 |
| Lockheed U-2 |
 |
| B-58 Hustler |
In 1964 bases Fairford and Greenham Common were closed. The B-47 detachment at RAF Brize Norton were stood down on the 1st of March 1965.
Upper Heyford remained the only US Oxfordshire airbase and now housed a detachment of the 98th Strategic Wing to support the Boeing RC-135 reconnaissance aircraft of the 55th and 6th Strategic Wing at Eielson Airforce Base in Alaska and the KC-135A tankers from the 98th Strategic Wing in Torrejon Airbase in Spain.
The 3918th Strategic Wing was discontinued in Summer 1965 and the base was transferred to the United States Air Force in Europe (USAFE). It was assigned to the 3rd Air Force group and the 7514th Combat Support Group.
 |
| From the 1954 Upper Heyford Airbase Yearbook |
On March 7th 1966, France (under Charles De Gaulle) withdrew from NATOs integrated military structure and the US were required to remove all forces from France by 1st April 1967. The McDonnel RF-101 Voodoo aircraft of the the 66th Tactical Recon Wing were moved from Laon-Couvron Airbase in France to Upper Heyford Airbase.
 |
| RF-101 Voodoo Supersonic Jet Fighter |
In 1969 the base hosted RF-4C Phantoms and the 66th Tactical Recon Wing was deactivated in January 1970.
On the 1st of June 1970, the 20th Tactical Fighter Wing was relocated to Upper Heyford from RAF Wethersfield and on the 12 of September 1970 the first F111-Es (F-One-Elevens) arrived, nicknamed Aardvarks.
These F111s participated in many NATO and US joint exercises with the Pakistani, Turkish and other airforces.
In 1979 the base was 'hardened' as part of the enhanced protection. Many of the structures were covered with thick concrete to minimize damage from a first strike. The hardened buildings can withstand a direct hit from a 500lb (226kg) bomb or a near miss by a 1000lb bomb. The location of the hangars was also made in such a way that only one hangar could be hit in a single pass.
The buildings were covered in a yellow paint to reduce the Infrared signature, however it was later found that the snow would not stick easily to the paint and so in winter the yellow buildings stood out in the white snow.
The 4th Squadron joined the base on the 1st of July 1983 to provide the 42nd Electronic Combat Squadron for Electronic Warfare and defense using EF-111A Ravens. The EF-111A provided radar jamming, Counter Measures Receiving System (CRS) for radar detection warning and other electronic warfare systems to protect other aircraft.
In March 1986 the 42nd Electronic Combat Wing were detached to take part in Operation El Dorado Canyon - the raids on Libya. 5 EF-111As and 20 F-111Es took off from Upper Heyford to act as reserves and provide electronic defence during the raids.
On the 17th of January 1991 the 20th Tactical Fighter Wing launched from Upper Heyford to take part in Operation Desert Storm in Turkey and Saudi Arabia. Over 458 personnel were deployed, flying 1798 sorties. 4714 tons of ordnance was dropped and the wing suffered no losses.
At the end of the Cold War, the USAF presence at Upper Heyford was scaled down. The last F-111Es departed on the 7th of December 1993, the "06-055 Heartbreaker" which is now on display at the Robins Airforce base in Georgia, the "068-061 The Last Roll of Me Dice", which is now at the Davis Monthan Airbase in Arizona and the "68-020 The Chief" which is now at Hill Airforce Base in Utah.
The base was officially closed on the 15th of December 1993 and has been abandoned since. Some parts of the base, such as the hardened hangars are used for storage of archives or important paintings, equipment and documents. The base is also used for police driving and training and some areas have been sold to private business such as a shipbuilder and motor vehicle company.
The base was scheduled for demolition to make way for a new housing estate, but historians managed to get some of the buildings on the heritage list. By the time we visited, many of the old accommodation buildings had been removed.
The base has been used in many movies - the front gate was used in James Bond Octopussy as the base that hosts Octopussy's circus and the green on which the big top was erected is outside the Base Operations Centre.
The Secure Weapons Area was used as a Gulag in Muppets Most Wanted and a trench outside the Maintenance building was used in World War Z as the trench that Brad Pitt rides his bike down. World War Z also used the Upper Heyford Air Base supermarket as a set piece, which was super-imposed onto a city background. The supermarket had been demolished by the time we arrived, but here's an old shot and the shot from the movie:
 |
| Upper Heyford Airbase Supermaket |
 |
| World War Z Supermarket - Note the tree and the "Welcome to yo r store" sign in the bottom right |
 |
| Aircraft Maintenance Trench |
 |
| Bike riding scene from World War Z - in the same trench |
Maps of the Area:
The photos we took on our tour don't really show the layout of the base or the location of the buildings so I've put a few maps in below to show where things are and to give some context to where we toured.
 |
| Map of the domestic side of Upper Heyford (doesn't include the airfield) |
The next three maps are from the Cherwell District Council RAF Upper Heyford Conservation Area Appraisal Document (April 2006) - RAF Upper Heyford Conservation Area Appraisal
 |
| The southern part of the Airfield |
 |
| The northern part of the Airfield |
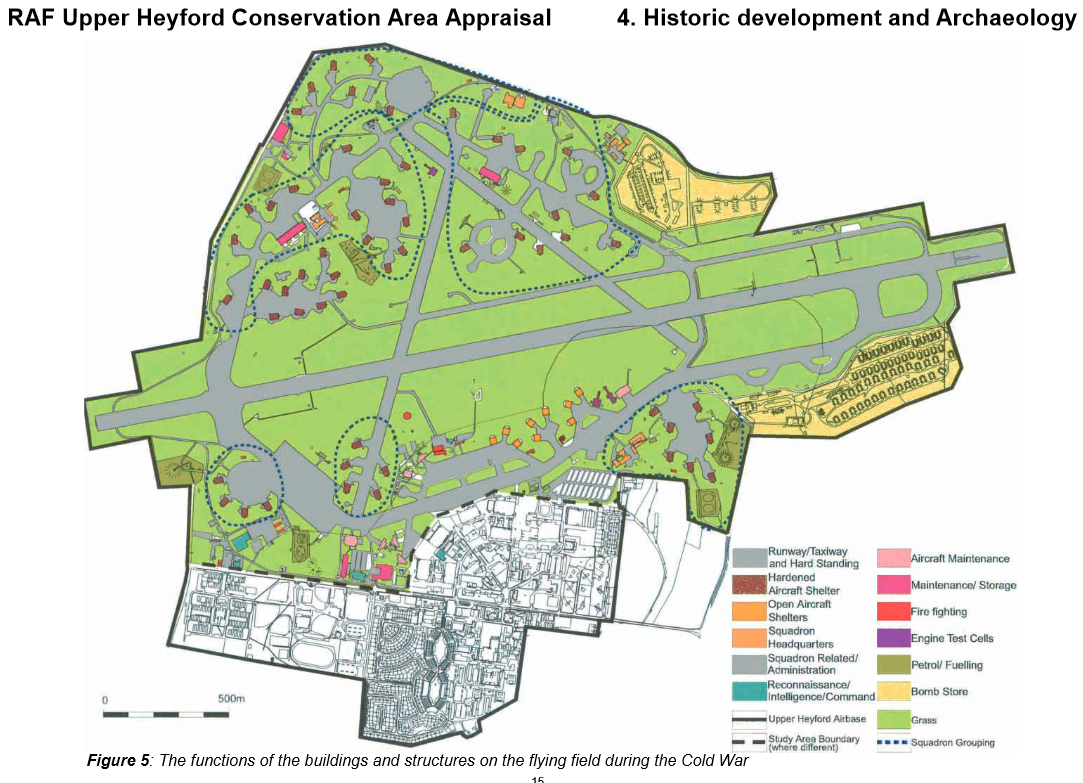 |
| Location of buildings in the Airbase |
The following map shows the tour we took around the airbase - we started in the bottom right and then re-entered in the bottom left.
 |
| Our Tour |
Our Tour
We took the tour on the 24th of April 2016 and visited sections of the airbase. The tour was hosted by Chris and Neil of the Upper Heyford Heritage Group.
Approaching the Base
As we drove towards the base, the signage showed that while areas of the airbase were open for businesses there was still some level of protection:
 |
| Warning sign |
 |
| Clearing the land |
 |
| The land cleared up to the Nose Docking Sheds |
 |
| Some of the old accommodation blocks - circa 1950 |
Entering the Base
We entered the base from Camp Road and drove past the security buildings into a carpark as directed by the guards. Neil arrived shortly after, followed by Chris and the rest of the tour group. We had a quick amenities break in the old security building and were greeted by some wall art by the former security teams:
 |
| Security Wall Art |
Once we returned, we took a few quick drive around the area, seeing the former base HQ, security and clubs (NCO and officer), but most of the area had been converted to Heyford Technology park.
We then drove down to the main entrance of the base and into the gates that featured in James Bond Octopussy:
 |
| The Gate |
 |
| The gate (in the far distance) in Octopussy |
Once we passed the gate we were into the Airfield proper and started to see the hardened aircraft hangars that appeared to be scattered haphazardly around the base. It was explained that this was to ensure that any bombing run could only hit a single hangar in a pass.
The former airbase movie theater was looking a little worse for wear:
 |
| Where the theater used to be |
The first building we passed was the former training area for guard dogs that had been converted to a dog training school for the general public. We also started to see the hardened aircraft shelters (marked with the orange diamond in our tour map above.)
 |
| Dog training |
 |
| Perimeter fence and the Rapier Site |
09 Approach to Main Runway
We then rounded just next to the 09 Approach to the main runway and turned towards Avionics Maintenance. The runway at Upper Heyford is 2miles long and there were plans to dig it up as part of the redevelopment, but the concrete is over 7 feet (2.1m) thick. The US Airforce ran the base, but the UK RAF was responsible for infrastructure.
There are 9miles of fences around the perimeter of the base.
 |
| 09 Approach to the runway |
 |
| 09 Approach to the runway |
We also caught sight of the plinths that formerly housed the fuel tanks.
Avionics Maintenance Bay
Our first stop was the Avionics Maintenance Bay, where aircraft were maintained and where the data was extracted from the spy and reconnaissance aircraft. This was the building with the trench used for the World War Z as I explained above.
 |
| The Avionics Maintenance Building (Panoramic) |
Upper Heyford has no tunnel system or underground buildings, but the Avionics Maintenance Building is the only building to be partially sunken.
 |
| The old hoist and control for aircraft at the Avionics Maintenance Building |
 |
| The building was quite well protected - thick concrete and partially buried in the hill |
 |
| The main doors to the facility. |
 |
| The arm of the hoist. This was able to be extended into the building |
 |
| The decontamination shower - most buildings had a 'clean' and 'dirty' (potentially contaminated) entry |
 |
| The main entry |
 |
| The personnel access door |
 |
| The trench outside the facility |
 |
| Looking down the trench |
 |
| Another entrance - heavily blast protected. |
 |
| This photo shows how thick the blast door is. It is made of solid steel |
Looking north of the facility we could see the backs of the first bank of hardened aircraft shelters. Many of these were now used to store archives, or sensitive equipment as they are blast proof and environmentally stable:
 |
| Hardened aircraft shelter |
 |
| Aircraft shelter and a plinth for a fuel tank |
 |
| This shelter was dedicated to Lilly |
 |
| This panoramic shot shows the spacing of the hangars |
 |
| Another raised area where a Rapier Surface-to-air missile array was located |
 |
| Stock photo of a Rapier SAM unit (not at Upper Heyford) |
Quick Response Alert Area (QRA)
The QRA was the rapid response section of the airbase. It was established to provide a 3 minute launch time for aircraft in retaliation to an attack from the Soviets. Pilots and flight crew lived in the QRA 24 hours a day, 7 days a week, while security performed eight hour shifts.
The QRA was surrounded with two rows of wire fence. The security team were authorised to give a warning if anyone approached or touched the first fence, but to respond with deadly force if anyone touched the second fence.
 |
| The two rows of fences |
 |
| Guard house |
 |
| Sentry Tower |
 |
| Guard Room |
 |
| Pilot and flight-crew housing |
The housing area consisted of dorms and recreation rooms including pool tables. They were serviced by a cafeteria that served milkshakes, grills, hamburgers and other foods.
 |
| This shot shows the spacing of the hangars |
The shelters used in the QRA were transported from Vietnam after the Vietnam war and initially consisted solely of the metal arches to keep the weather off of the aircraft. In the 1970s when the bases were hardened, they were coated in thick concrete to enhance their protection from bombing.
We entered Hangar number 7. All of the Hangars were named after World War II heroes and this was named after Lt Col John B England after a World War II fighter ace. The hangar is at an elevation of 435 ft with a true heading of 190 degrees at coordinates N 51° 56' 34, W01° 15' 77.
 |
| Details of the hangar |
 |
| The entrance to a hangar |
 |
| Inside the hangar |
 |
| Inside the Hangar |
 |
| Blast diffusion area behind the metal doors at the back of the hangar |
 |
| The hangar doors, concrete and steel but able to be opened in 1 minute by the door motors |
 |
| Wall art in the Hangar - courtesy of the 55th squadron |
3 Bay Munitions and 55th Tactical Wing
When we finished up at QRA we drove past the 3 Bay Munitions building, where the airmen practiced loading munitions on aircraft.
 |
| 3 Bay Munitions |
 |
| 55th Tactical Wing Buildings |
Jet Testing Facility
Our next stop was the T2 Jet Engine Cell. This was where the jet engines were tested.
 |
| One of many warning signs |
 |
| T2 Jet Testing Facility |
In 1988 a jet engine failed and caused significant damage to the cell, so a newer and safer cell was created, the T9 Engine Test Cell, which utilized a augmentor acoustic tunnel rather than the water-cooled diffuser.
 |
| The pump room |
 |
| The floor of the power generation room was a bit worse for wear |
 |
| Wall art in one of the maintenance rooms |
 |
| Fuel tank for testing |
 |
| BBQ outside the test facility |
 |
| The western side of the test room (where the front of the engine would sit) |
 |
| Water Cool Diffuser |
Our next stop was the impressive Electronic Combat Squadron building, one of the newer ones on the site, dating to 1986 when the ECS squadron moved to Upper Heyford.
 |
| 42nd ECS Building |
 |
| Closer view |
 |
| Looking towards the main entrance - look at the thickness of the door |
 |
| Entrance door |
 |
| Rear of the Building |
 |
| 77th Tactical Fighter Squadron |
Weapons Storage Area
Our next stop was the Sophisticated Munitions Storage. This area was also guarded by double fences, like the QRA.
 |
| Sentry tower in Sophisticated Munitions Storage |
 |
| Sophisticated Munitions Storage |
 |
| Sophisticated Munitions Storage Main Entrance |
 |
| Sophisticated Munitions Storage Main Entrance |
 |
| Sophisticated Munitions Storage Main Entrance |
 |
| Sophisticated Munitions Storage |
I mentioned earlier that Upper Heyford officially held no nuclear weapons. 'If' they did, this is where the triggers would have been stored. The white building visible in the photo above was a trigger storage vault. It was camouflaged to look like a regular office building, but the windows were fake and behind several feet of concrete it held a vault which would hold the triggers and shapes for the weapons.
We couldn't get into the area as part of this tour, but there are some great photos of the building in another blog: The bohemian blog- USAF Upper Heyford - Chasing Cold War Ghosts In Rural Oxfordshire
At the corner of the base nearest to the Munitions Storage sat Whiskey 13, a lonely guard tower that base mythology holds to be haunted.
 |
| Whiskey13 from the Munitions Storage |
 |
| Whiskey 13 |
T9 Jet Test Facility and Victoria Alert
On our drive to the next area, we passed the newer T9 Jet Test Facility, built to replace the damaged T2 facility:
 |
| T9 Jet Engine Test Facility - the test building is the central one with the large tunnel (the acoustic tunnel) |
 |
| Victoria Alert Site |
Control Tower
Our next stop was at the Control Tower and Crash facility. The tower dated from the 1950s and operated for the entire duration the base was in US hands.
 |
| Sentry Tower by the Control Tower - I wouldn't want to climb this one |
 | ||
| Sign for the Control Tower |
 |
| The Control Tower |
 |
| Control Tower |
 |
| Control Tower |
The signal sent would read:
"Solar-terrestrial indices for <UTC DATE> follow: Solar flux <NUMBER> and (estimated) Boulder A index <NUMBER>. Repeat Solar flux <number> and (estimated) Boulder A index <NUMBER>. The Boulder K index at <UTC TIME> on <UTC DATE> was <NUMBER>, repeat <NUMBER>."
This data was used to monitor solar flare radio frequency interference that could affect communications. The magnetometer would measure the current orientation magnetosphere and this could be compared the the predicted 'quiet' values from the transmission.
 |
| Magnetometer plinth |
The magnetometer plinth was originally installed on grass, but mowing the lawns would affect the reading.
Also in the area around the Control tower were the VIP entry area and intelligence buildings:
 |
| Intelligence, Maps and Charts Center |
 |
| Inside the Intelligence, Maps and Charts Center |
 |
| Buildings |
 |
| Fire Fighting Building |
A last point of interest was that the grassed area in front of the Control Tower was used as the site of Octopussy's circus in James Bond Octopussy:
 |
| The grassed area now |
 |
| The buildings used as backdrop for Octopussy |
 |
| The area in Octopussy |
Telephone Exchange and Nose Docking Sheds
Our next stop was the Telephone Exchange, this exchange handled the British Telecom (BT) unsecured communications for the site. We were unable to enter as the building's halon gas fire protection system had not been deactivated.
 |
| BT Telephone Exchange Building |
As we drove to the next location we caught a glance at the nose docking sheds.
The nose of the aircraft held most of the important electronics, so these sheds were used to access and maintain the nose of the aircraft:
 |
| Nose Docking Sheds |
 |
| Nose Docking Sheds |
Command Post
The tour saved the best for last, a well preserved Command Building.
 |
| Command Building |
 |
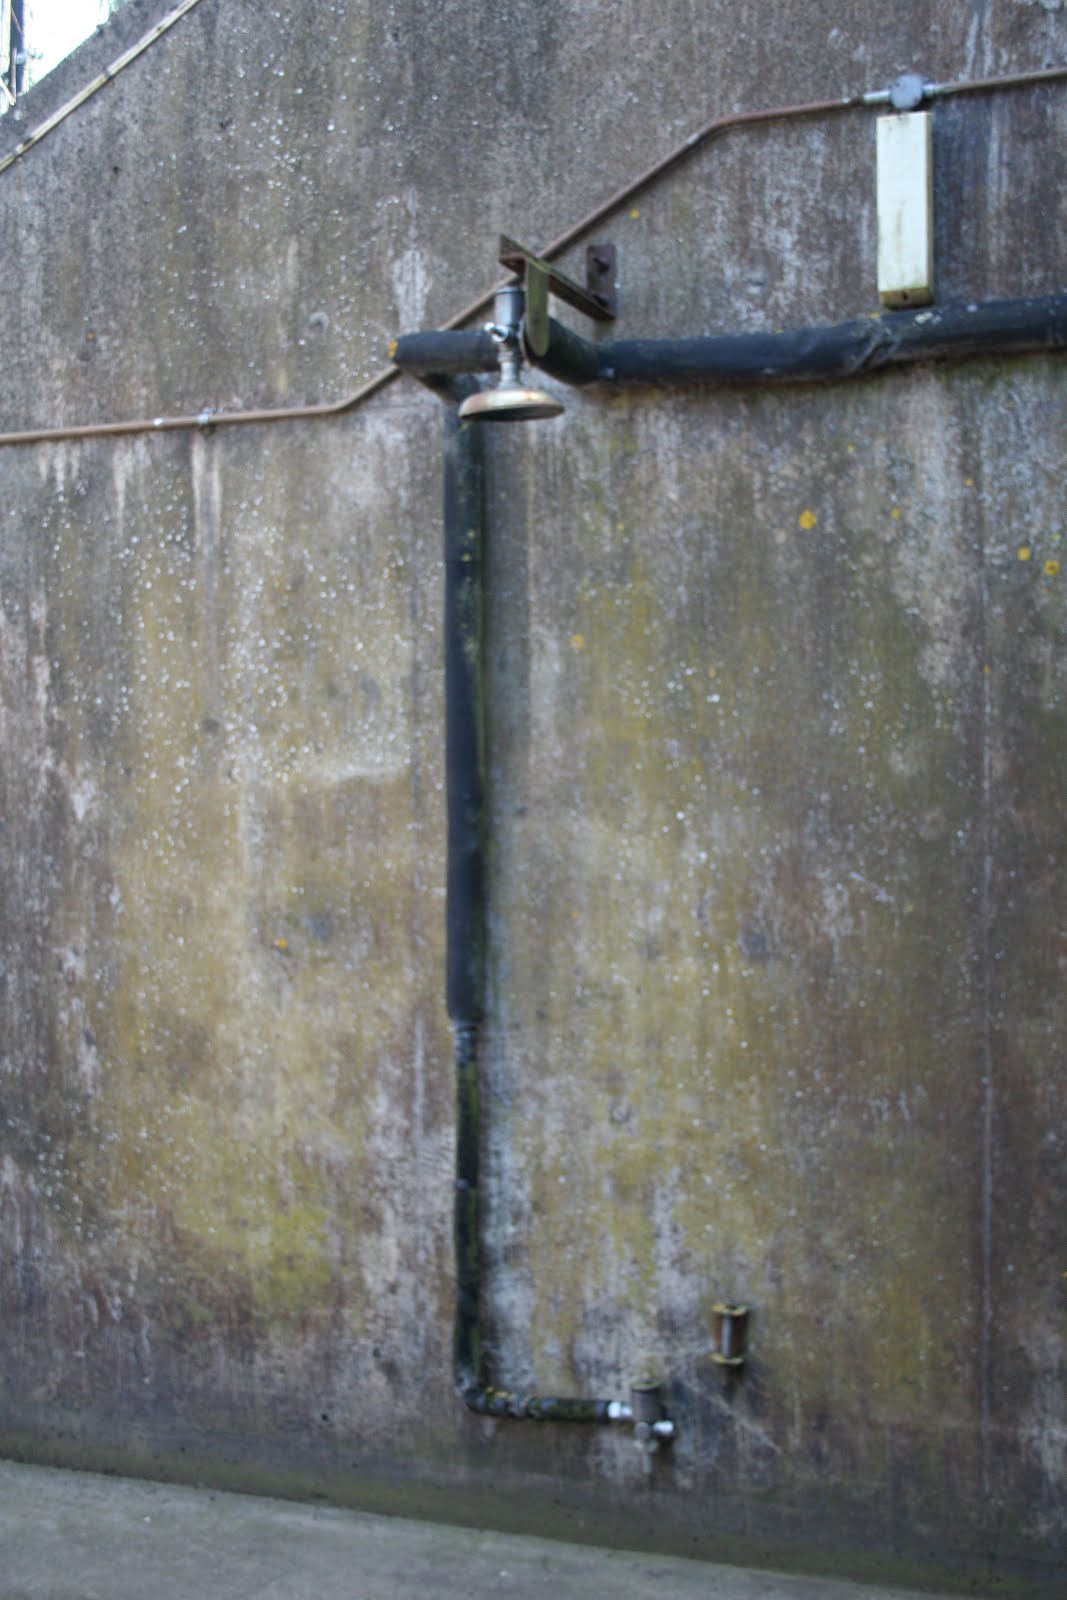
| Decontamination Shower |
We entered the post through the 'dirty entrance' and passed into the decontamination area:
Command Post - Decontamination Area
 |
| Security Desk to control access |
 |
| The interior entry door |
After passing the main door, the security desk and then a second safe-line interior door, we arrived in a long tunnel-like corridor.
 |
| Corridor |
Our first point of entry was through the decontamination room. Anyone requiring decontamination would be barred from entering the main internal doors and instead be directed to a side room.
 |
| Decontamination Room |
This room was locked from both sides and could only be opened externally once the staff were satisfied that the entering person was suitably decontaminated. The hatch on the right side of the photo led to a furnace that would incinerate any contaminated clothing or suits.
The water used in this decontamination shower was provided by a plant within the command post, isolated from other sources in case external water become contaminated.
 |
| Intercom and Control for decontamination |
 |
| Intercom |
 |
| A quick glance into the plant room |
 |
| A photo of the door firing slot - unfortunately blurry due to low light |
Once inside, our first room was the Command Post Phone Exchange. This was still in use by BT and originally handled the unsecured communications.
After this was the Comms Suite. This site was mostly empty, but would originally have been filled with consoles and equipment. The room was fitted with a floating floor to allow for underfloor cooling to equipment racks and underfloor cabling.
 |
| Comms Suite |
The room had an escape hatch that would lead directly outside of the Command Post. This shot shows how thick the concrete walls of the post were. This would normally have been sealed with a safe-style door and possibly concealed.
 |
| Escape Hatch |
 |
| Escape Hatch |
Each of the rooms was fitted with a secure door and a message slot. Entry was prohibited to each room except for authorised personnel. Messages were passed through the window slots if required.
We found this message for crypto changeover, dated 10th Jan 1986.
 |
| Crypto change over. |
The Secure Comms room was next, through a door from the Comms Suite. The room was coated in metal to create a Faraday Cage, which prevents the passing of electrical interference, which would prevent an enemy using electronic means to intercept messages or to interfere with operations.
19th Squadron Room
The 19th Squadron maintained the air defence of the base and they had their own room in the Command Post:
 |
| 19th Squadron |
Emergency Access Cell.
We now passed through the double metal doors and the gun slot into the heart of the base. The first caged door opened into a small space watched over by the gun slot. There was a video camera normally fitted here as well as an intercom.
The first room we entered was the Emergency Access (EA) Cell. This was manned 24 hours a day, 365 days a year by at one officer and one Non Commissioned Officer (NCO). This room would receive and decrypt any classified messages and action them. The room had access to the site-wide loudspeakers as well as the message runners to the rest of the Command Post. Messages could be received from the Comms Suite and passed through the message hatch in the back wall or by anti-jam satellite communications (Flaming Arrow Net or AN/TSC124). The staff in the room were always armed with revolvers and a shotgun for each staff member was mounted on the window frame.
 |
| Battle Command Centre |
 |
| Message Hatch |
 |
| Site-wide intercom control |
 |
| Communications |
 |
| Site Status Record |
 |
| Sign on the door |
 |
| Indicators of the status of the loudspeaker system |
Command Post - Battle Planning
The next stop was Battle Planning. After passing through the double security doors, the EA cell was on our right and Battle Planning on the left. The entrance to The Pit was directly ahead. Battle Planning had a much better view of The Pit status boards and it was here that any Battle Plans could be coordinated.
 |
| Battle Planning |
 |
| Telephone showing the call-signs of many of the bases |
 |
| Entry to map room |
The map room originally housed a wall-sized map of Europe with a variety of overlays for different classified information. The overlays were removed when the base was closed, and the map was mostly destroyed:
 |
| The remains of the map |
The map was quite interesting (the parts of it that remained) and dated 1985. Many of the Russian towns were labelled as "Name Unknown" as they had been detected on reconnaissance but the names were unknown
 |
| Section of the map showing unknown towns in Russia |
 |
| Map - showing the Minden-Lubecke district in North Rhine-Westphalia, Germany |
 |
| A larger section of map ranging from Paderborn in North Rhine-Westphalia, Gemany in the south to Wiefelstede in the Ammerland District of Lower Saxony, Germany |
Command Post - Weather Room
The second to last room we visited was the Weather Room, where the weather over the airfield and Europe would be tracked and recorded.
 |
| Weather Map |
Our final stop was the area we had been seeing from the EA and Battle Command rooms. The Pit was only usually fully manned for exercises or war, but it tracked the status of the base, the condition or aircraft and the flight planning.
 |
| The Pit |
 |
| The Pit |
 |
| The Pit |
 |
| Alert Status Indicators |
The Air Raid Warning has the following settings:
White - All Clear
Yellow - Attack Likely (raiding aircraft on way to UK)
Red - Attack Imminent (raiding aircraft heading towards the airbase)
The Local Alarm Condition has four settings:
White / All Clear - Attack is not probable
Yellow - Attack is probable within 30 minutes or less - seek protective shelter
Red - Attack is imminent or in progress.
Black - Attack is over but unexploded ordnance and/or Nuclear, Biological,Chemical (NBC) contamination may be present.
The Base Alert Status has the following settings:
State Orange - Threat of attack is high
State Scarlet - Reinforced Alert - highest level of alert
MIL VIG - Military Vigilance
SIMPLE - Simple Alert
PRECAUTIONARY MEASURES
COUNTER-AGGRESSION
 |
| Personnel Shelter and MOS Status |
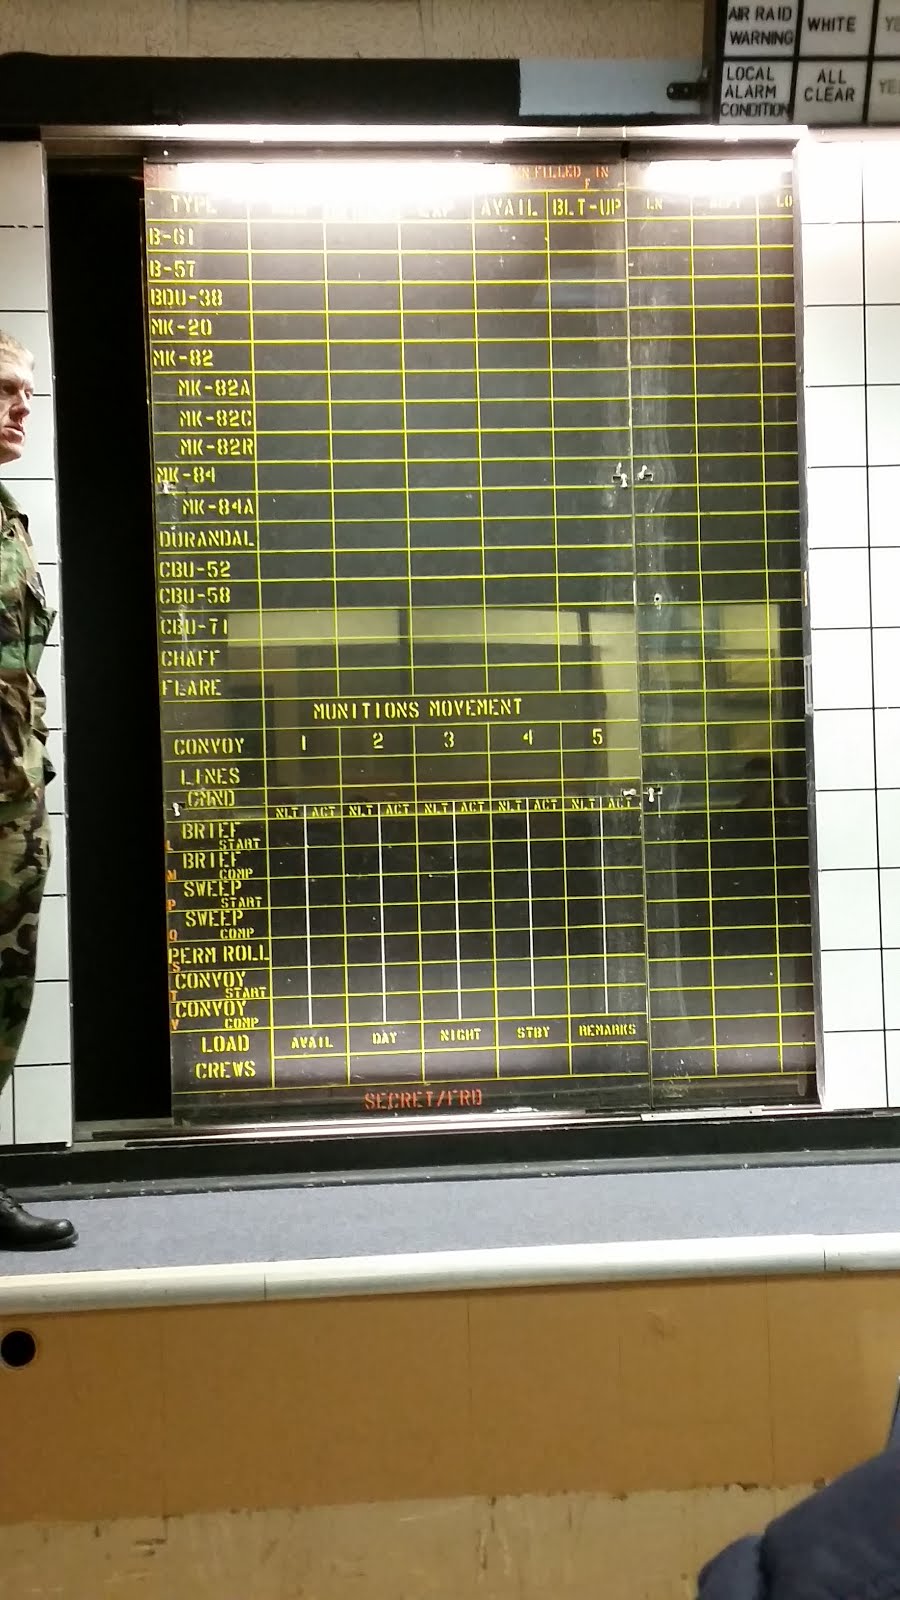 |
| Munitions Movement Board |
The board lists the following munitions:
B-61 - Tactical Thermonuclear Bomb (Silver Bullet)
B-57 - Tactical Nuclear Weapon
BDU-38 - Practice Bomb (Nuclear)
MK-20 - Freefall Cluster Weapon (Rockeye) kills tanks and armoured vehicles
MK-82 - General Purpose Bomb (GP) 500lb bomb
MK-82A - General Purpose Bomb (GP) 500lb bomb AIR
MK-82C - General Purpose Bomb (GP) 500lb bomb
MK-82R - General Purpose Bomb (GP) 500lb bomb
MK-84 - Free Fall Non-Guided (GP) 2000lb bomb
MK-84A - Free Fall Non-Guided (GP) 2000lb bomb - Air Bag Parachute Retarded
DURANDAL - BLU-107 Anti Runway Bomb
CBU-52 - Sub Munition (Cluster Bomb) - 220 Bomblets
CBU-58 - Sub Munition (Cluster Bomb) - Incendiary 650 Bomblets
CBU-71 - Sub Munition (Cluster Bomb) - Random Delay Fuze - 650 Bomblets
CHAFF - Radar Countermeasure
FLARE - Missile Countermeasure
Now this doesn't necessarily prove anything, as the Command Posts were standard across all US airbases to ensure that staff could easily move between them. The inclusion of the nuclear missiles may have just been because they were present at ONE of the airforce bases.
But, when you couple it with these items that were found by the Upper Heyford Heritage team, there's some fairly conclusive evidence:
| Nuclear Safety Award - 20th Tactical Wing, Upper Heyford 1973 |
| Nuclear Safety Award - 20th Tactical Wing, Upper Heyford 1971 |
(Photos from the Upper Heyford Heritage Centre Facebook Site: UH Heritage site)
 |
| Panoramic shot of the pit |
 |
| Control Desk |
 |
| Control Panel Abbreviations |
 |
| Chart showing the details of the last flights from Upper Heyford |
 |
| Last flights from heyford |
The next (and last) photo was Kristine's favourite of the whole trip:
 |
| It doesn't work! |
That concluded our tour of the airbase. It was great to see the area where my Grandfather served, even though most of the original buildings were different to when he served, either having been replaced or hardened with concrete reinforcement.
The Upper Heyford site shows an amazing history of the Cold War and it is easy to imagine the site bustling with airmen and soldiers in the shadow of a possible nuclear conflict. Upper Heyford may not hear the sound of jet fighter engines again, but I hope that the Upper Heyford Heritage team can win their battle to preserve this unique base and its insight into both United States and United Kingdom history.
A big thank you to our excellent tour guys and I would highly recommend the tour to anyone who is interested.